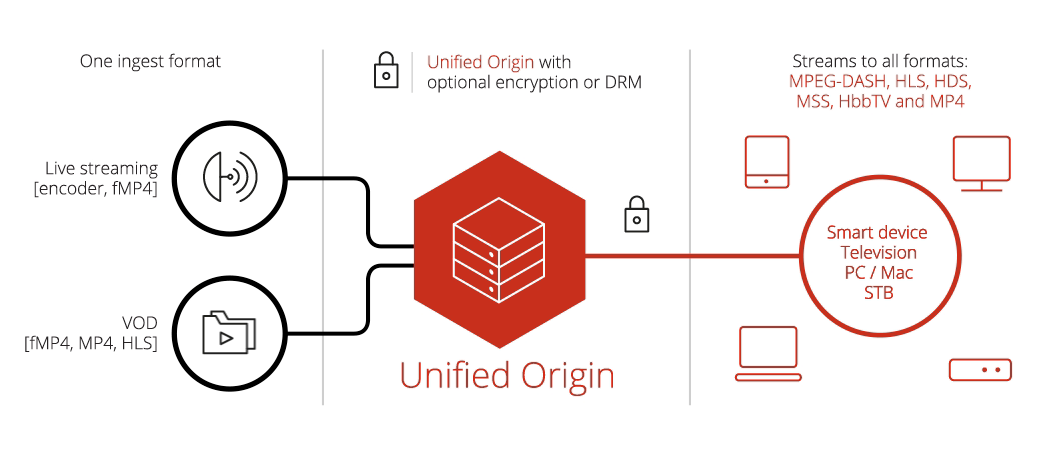
DRM
Table of Contents
Learning Outcomes
- Understand the difference between encryption and DRM
- Know what a third-party DRM provider does
- Basic understanding of DRM API’s
- Basic understanding of troubleshooting

Use Cases
Background
The difference between DRM and encryption is that encryption is ‘simply’ a tool to make content usable only by those who are able to decrypt it (because they have the key), whereas DRM employs a complex toolchain of which encryption is only one element, and this whole toolchain protects the content and offers fine-grained control over who is allowed to use it. In short, encryption is the first step in a DRM deployment, but it’s not the only step.
For video streaming, content is always encrypted using AES-128 encryption, which uses a key of 128 random bits to encrypt the content. It is a symmetric-key algorithm, which means that the same key is used for decryption.
The main difference between encryption and DRM is the way in which a client acquires the Content Encryption Key (CEK), which is used to decrypt the content. In a DRM setup this key is obtained securely via a request to a license acquisition (LA) server which returns a key AND a license specifying the circumstances in which the key is valid (thus managing the users rights for the content). The CEK and license are usually indentified by a Key ID (KID), a player calls an LA server using the KID to receive the matching CEK and license.
The major DRM systems are listed below. Each comes with its own kind of LA server. There are many third-party DRM providers making use of these systems to provide fully integrated DRM solutions:
| Digital Rights Management | DASH | HDS | HLS | HSS |
|---|---|---|---|---|
| Microsoft PlayReady | yes | yes | yes | |
| Adobe Primetime | yes | yes | yes | |
| Marlin | yes | yes | ||
| Widevine Modular | yes | |||
| Apple FairPlay | yes |
Not all DRM systems are supported on all platforms and support for the various video streaming formats also differs. Hence the need to use more than one DRM system if you wish to deliver your content to a broad population.
Encryption Itself
Although content is always encrypted using AES-128, each DRM system functions differently (signalling etc.). This necessitates separate encryptions if you wish to work with several DRM systems, or use of the origin for dynamic encryption (CDN caching efficiency is still not optimal).
Common Encryption (CENC) v3, standardizes the four schemes in which DRM systems apply AES-128 encryption. The first two (‘cenc’ and ‘cens’) are based on the Counter (CTR) mode of operation, whereas the last two (‘cbc1’ and ‘cbcs’) are based on the Cipher Block Chaining (CBC) mode of operation. It can be argued they are equally secure or unsecure, however greater speed (amongst other benefits) has lead to greater use of CTR . [3] [4]
CTR is used by most DRMs i.e. Marlin, Widevine, PlayReady and Adobe Primetime. Apple FairPlay,the exception, uses CBC. With CENC v3 PlayReady and Widevine have added support for CBC.
The W3C Recommendation of Encrypted Media Extensions (EME) and their implementation in all major web browsers now means DRM can be used to protect content without the need for separate plugins such as Silverlight or Flash.
Working with DRM Vendors
Unified Streaming supports the following third party DRM providers, the list is not exhaustive, others may be added.
- Axinom
- BuyDRM
- Cisco
- Conax
- DRMToday
- ExpressPlay
- EZDRM
- Irdeto
- Nagra
- Verimatrix
- Vualto
While each have their own API the integration stays the same: there needs to be a layer between the DRM API and Unified Packager/Origin. See the example section in our documentation for how to work with these APIs using ‘bash’ with JSON/XML parsing in Python. Using different tooling and programming languages is also possible. [2]
Alongside Encryption mode differences DRMs can also use either little or big endian formatting for the KID. Most DRMs using KIDs format them big endian, the UUID format, with the exception of Microsoft PlayReady which is little endian, the GUID format.
The DRM vendor informs you of the formatting style as there is no programmatic way to ascertain or distinguish between formats.
An example:
| UUID | GUID |
|---|---|
| d05d0e1f-5093-4e6b-bbbf-fd9effbba1a9 | 1f0e5dd0-9350-6b4e-bbbf-fd9effbba1a9 |
Once known KID conversion can be done easily.
Your Own License Server
Depending on the licensing conditions a DRM is provided under, it is possible to develop and maintain your own license server. This is quite common with PlayReady and Fairplay; Microsoft and Apple provide SDKs to develop your own license server.
Marlin and Widevine are typically provided by Intertrust and Google from a hosted, cloud based environment. In this case you would create a proxy for your players to refer to which contacts the DRM service for keys and policies.
PIFF to CENC
You may be contracted to store your premium content (movies, shows etc) DRMed. If the DRM chosen for on-disk storage is a previous version of PlayReady (pre v4) then the format applied is the ‘Protected Interoperable File Format’ (PIFF). [1]
PIFF is not the same as CENC. If you need both PIFF and CENC, or wish to switch to CENC completely you might need to re-encrypt all content, which is both a time and storage consuming process.
Origin can increase efficiency by applying the conversion dynamically: from PIFF on disk to CENC to player, for instance from PlayReady to Widevine.
The opposite (CENC2PIFF) is also possible.
Using Encrypted Content (transDRM)
Unified Origin can also take already encrypted files and change that encryption on-the-fly.
If, for instance, your content is stored on disk PlayReady, CTR, encrypted and you need to support FairPlay, CBC, encryption the content needs to be decrypted and re-encrypted.
Fortunately, the origin can do this dynamically, on-the-fly. The original encryption key is passed to the origin in the manifest:
#!/bin/bash

KID=10000000100010001000100000000001
CEK=3A2A1B68DD2BD9B2EEB25E84C4776668

mp4split -o video.ism \
  --key=${KID}:${CEK} \
  /var/www/tears-of-steel/tears-of-steel-avc1-400k.mp4
Passthrough
Encrypted content content can be used ‘as is’, without access to the original encryption keys, one example being PIFF2CENC, but this is mostly about changing DRM (e.g. PlayReady –> Widevine).
‘Passthrough’ is where HSS+PlayReady, for example, playout can be used ‘as-is’, as it is available in storage, the content is not touched or altered by Unified Origin, it simply passes through.
Multi DRM
The CENC scheme specifies standard encryption and key mapping methods that can be utilized by one or more digital rights management (DRM) and key management systems to enable decryption of the same file using different DRM systems. Such an approach supports a broader range of accessible clients from a single content stream.
For multi DRM to work with different key providers (Widevine and PlayReady for example), the same key id and content key must be used with all the key providers.
You would need to create or use a service that abstracts away the differences of the different APIs. See multi DRM for more background. [5]
Multiple key DRM
DRM with multiple keys allows you to encrypt different tracks in a stream with different keys, rather than using one key to encrypt all audio and video tracks.
For example:
- Encrypt audio with different key than video
- Encrypt some audio or video tracks, but not all of them
- Encrypt premium features with different key than standard features
- Encrypt all tracks with separate keys for complete flexibility
One reason for encrypting with multiple keys is to support a setup where different tracks are associated with DRM licenses that have different requirements. Such a setup is possible using only one encryption key but becomes more secure when using multiple keys so each key is only associated with a particular license. The latter approach is recommended by all major DRM systems.
CPIX
To use DRM with multiple keys with Origin it is required to define your content protection configuration using a separate XML-file called a CPIX document. [6] [7]
Please note, CPIX is not required to use multiple keys with static packaging (tracks are encrypted with different keys directly - see the Packaging Hands-On section).
CPIX is an open specification developed by DASH-IF that offers support for all major DRM systems and play-out formats. The idea behind CPIX is to provide an interoperable format to exchange content protection configurations between different systems that need to interact within a video streaming setup.
A demo can be found online. [8]
Key Rotation
DRM with key rotation allows you to rotate the encryption key over time. This can enhance security and allows for more flexibility. For example, it allows you to leave a lead in the clear, or associate different programs in a stream with different keys.
Encrypting different programs with different keys is helpful when you intend to associate different programs with DRM licenses that contain different requirements. For example, decryption of some programs will only be allowed based on whether the end-user has a premium membership, or is paying extra to watch live sports, while others only require a regular subscription.
Rotating the encryption key at set intervals also increases content security.
Attention
This feature is only supported for HLS TS and not for fMP4 HLS or for DASH.
Deployment and Workflows
The most straightforward way of working with DRM is adding the KID and Content
Key to the manifest using the mp4split commandline. The following command
will create the below manifest:
#!/bin/bash

KEY=${KID}:${CEK}
DRM_SPECIFIC_DATA=AAAAaHBzc2gBAAAA7e+LqXnWSs6jyCfc1R0h7QAAAAIQAAAAEAAQABAAEAAAAAABIAAAACAAIAAgACAAAAAAAgAAACQSEBAAAAAQABAAEAAQAAAAAAESECAAAAAgACAAIAAgAAAAAAI=
LSU="http://license.uat.widevine.com/cenc/getcontentkey/widevine_test"

mp4split -o drm-example.ism \
  --widevine.key=${KEY} \
  --widevine.drm_specific_data=${DRM_SPECIFIC_DATA} \
  --widevine.license_server_url=${LSU}
<?xml version="1.0" encoding="utf-8"?>
<!-- Created with Unified Streaming Platform(version=1.8.3) -->
<smil xmlns="http://www.w3.org/2001/SMIL20/Language">
  <head>
    <meta name="clientManifestRelativePath" content="tos-widevine.ismc" />
    <meta name="creator" content="Unified Streaming Platform (USP)" />
    <meta name="iss_playout" content="false" />
    <meta name="hls_playout" content="false" />
    <meta name="hds_playout" content="false" />
    <meta name="mpd_playout" content="true" />
    <paramGroup id="widevine">
      <meta name="drm_specific_data" content="AAAAaHBzc2gBAAAA7e+LqXnWSs6jyCfc1R0h7QAAAAIQAAAAEAAQABAAEAAAAAABIAAAACAAIAAgACAAAAAAAgAAACQSEBAAAAAQABAAEAAQAAAAAAESECAAAAAgACAAIAAgAAAAAAI=" />
      <meta name="key" content="KID:CEK" />
      <meta name="license_server_url" content="LSU" />
    </paramGroup>
  </head>
  ...
The content and server manifest may then reside in ‘secure storage’, storage that is encrypted: S3 for instance offers ‘Server Side Encryption’ (SSE) which configures Amazon S3 buckets to automatically encrypt objects.
In terms of workflow, the server manifest creation process can be extended to add a DRM step where the CMS provides a content ID to identify a specific piece. This then could be used to fetch the KID:CEK combination from the DRM service using the automation layer that is created between packager workflow and DRM service.
If the setup is deemed too insecure, the origin can be configured to fetch manifests dynamically, each time the manifest is required the origin will go to the CMS (or whichever service it is configured for) and request a manifest. The CMS can then decide to add, remove or change DRM keys. The manifest request can be done over HTTPS creating a secure environment with no actual keys on disk.
This option is called IsmProxyPass, which was discussed previously and in further detail in the ‘VOD’ section.
Troubleshooting
The first step in troublshooting failed play-out of DRMed content should always be trying the same content without encryption. It may be that the player, the content or the webserver hosting the url has issues. Only when clear playout works should applying DRM be attempted.
If clear playout works but DRMed playout does not, the next step is to look for an error code player side, such an error might point to an incorrectly configured license server that does not return any keys.
The DRMed origin output can be verified with ‘capture’ (a product discussed in a later chapter). Capture can decrypt the stream, verifying the encryption/decription works as expected and that the problem lies in either player or license acquisition server.
Hands-On
- straightforward encryption
- using a DRM system (Widevine for MPEG-DASH)
- using CPIX
- using Key Rotation
Using Encryption
The first hands-on involves using keys to encrypt content for HLS, as Unified Origin applies encryption on-the-fly we will only have to pass the keys on the command-line.
The key id (KID) and content encryption key (CEK) are passed using
--hls.key option where KID and CEK are separated by a colon, i.e.
--hls.key=KID:CEK.
As no KID is used for HLS AES-128, this can be left empty. The CEK is a 128 bit value and must be coded in hex (base16).
KIDs and CEKs can be generated and stored or fetched using third party API’s.
Note
Leaving your content library in the clear and relying on on-the-fly encryption allows for a lot of flexibility. Even though they are notoriously strict about content protection, most Hollywood studios allow this if the library itself is securely stored. However, if you wish to encrypt your content library on disk this is possible with Unified Packager.
Sample Encryption
For SAMPLE-AES, you need to pass two additional parameters on the command line
used to generate your server manifest. The --hls.playout=sample_aes option
enables sample encryption, while the --hls.key_iv= option allows you to pass
an additional key that Origin will use to offset the Content Encryption Key
when encrypting the content.
This Key Initialization Vector (KIV) makes the encryption more secure by preventing the occurrance of repetitive patterns.
#!/bin/bash

openssl rand 16 > key
openssl rand 16 > init_vector

CEK=`cat key | hexdump -e '16/1 "%02x"'`
KIV=`cat init_vector | hexdump -e '16/1 "%02x"'`

mp4split -o tos-sample-aes.ism \
  --hls.key=:${CEK} \
  --hls.key_iv=${KIV} \
  --hls.license_server_url=http://${aws_hostname}/key \
  --hls.playout=sample_aes \
  /var/www/tears-of-steel/tears-of-steel-aac-64k.mp4 \
  /var/www/tears-of-steel/tears-of-steel-aac-128k.mp4 \
  /var/www/tears-of-steel/tears-of-steel-avc1-400k.mp4 \
  /var/www/tears-of-steel/tears-of-steel-avc1-750k.mp4 \
  /var/www/tears-of-steel/tears-of-steel-avc1-1000k.mp4 \
  /var/www/tears-of-steel/tears-of-steel-avc1-1500k.mp4

sudo mv tos-sample-aes.ism /var/www/tears-of-steel
sudo mv key /var/www/tears-of-steel
Set up a full DRM implementation
The DRM license acquisition (LA) server handles a client’s request for a key securely by returning the CEK based on the KID passed to it.
Therefore, this Key ID needs to signaled in the client manifest, or in the dynamically packaged content itself so the client can make a request to the LA server. To enable this in Origin the Key ID needs to be passed as an argument when generating the server manifest.
With the above in mind, we will set up a full DRM implementation, using Google’s Widevine for MPEG-DASH.
Getting the DRM configuration information (from the Widevine LA test server)
With the above in mind, we will set up a full DRM implementation, using Google’s Widevine for MPEG-DASH.
In the ISO Base Media File Format (ISO BMFF, better known as MP4) the Protection System Specific Header (PSSH) box contains information about the DRM system that the stream is protected with. Based on this information, a client can acquire the license (including the key) that is needed to decrypt and play the media content.
In certain circumstances Origin can generate the PSSH data itself, based on
other DRM related information that is provided, but in this exercise we’ll
explicitly add the PSSH data via a command-line option. As this tutorial is
about Widevine, the option is --widevine.drm_specific_data.
Of course, we need to get this PSSH data from somewhere. We will use the Widevine’s license acquisition (LA) test server to request it. In order to do that, we will send a Base64 encoded JSON object to this LA test server.
First and foremost, this JSON object specifies a Content ID, which is not the same as a KID (although it serves a similar purpose within the realm of Widevine DRM, i.e., identifying the content). In response to our request that sends the JSON object, Widevine’s LA test server will send back a Base64 encoded JSON object that contains multiple Key ID (KID) and Content Encryption Key (CEK) pairs, as well as the PSSH data for each of these pairs.
This is all the information we need to add Widevine DRM to our stream that is delivered through Origin.
A closer look at the JSON object that we will send to the LA test server
For this exercise, the JSON object that we’ll send to the Widevine LA test
server looks like below, with ZmtqM2xqYVNkZmFsa3Izag== as the Base64 encoded
Content ID:
{
  "content_id": "ZmtqM2xqYVNkZmFsa3Izag==",
  "tracks": [
    { "type": "SD" },
    { "type": "HD" },
    { "type": "AUDIO" }
  ],
  "drm_types": [ "WIDEVINE" ],
  "policy": ""
}
Besides the Content ID, there are three types of tracks specified as well. The LA test server will send back a different KID and CEK pair for each of them.
Now, when we Base64 encode our JSON object:
echo '{
  "content_id": "ZmtqM2xqYVNkZmFsa3Izag==",
  "tracks": [
    { "type": "SD" },
    { "type": "HD" },
    { "type": "AUDIO" }
  ],
  "drm_types": [ "WIDEVINE" ],
  "policy": ""
}' | base64
It looks like this:
ewogICJjb250ZW50X2lkIjogIlptdHFNMnhxWVZOa1ptRnNhM0l6YWc9PSIsCiAgInRyYWNrcyI6IFsKICAgIHsgInR5cGUiOiAiU0QiIH0sCiAgICB7ICJ0eXBlIjogIkhEIiB9LAogICAgeyAidHlwZSI6ICJBVURJTyIgfQogIF0sCiAgImRybV90eXBlcyI6IFsgIldJREVWSU5FIiBdLAogICJwb2xpY3kiOiAiIgp9Cg==
Sending the request for the DRM configuration information
Now that we have the data that we need to send to the Widevine LA test server, the next step is to actually send and get the response with the information we need to add Widevine protection to our stream.
To do this we need:
- URL of the Widevine LA test server
- Base64 encoded version of the JSON object to send to the LA test server
- Base64 encoded, encrypted hash of the JSON object, to serve as the signature of the request
And we send it like this:
la_server=http://license.uat.widevine.com/cenc/getcontentkey/widevine_test
base64_json=ewogICJjb250ZW50X2lkIjogIlptdHFNMnhxWVZOa1ptRnNhM0l6YWc9PSIsCiAgInRyYWNrcyI6IFsKICAgIHsgInR5cGUiOiAiU0QiIH0sCiAgICB7ICJ0eXBlIjogIkhEIiB9LAogICAgeyAidHlwZSI6ICJBVURJTyIgfQogIF0sCiAgImRybV90eXBlcyI6IFsgIldJREVWSU5FIiBdLAogICJwb2xpY3kiOiAiIgp9Cg==
signature=kwVLL4xVh9mnlZlPqiEWN0E+FsvG0y+/oy451XXeIMo=

export wv_response=$(curl -v POST \
  -H 'Content-Type: application/json' \
  -d '{"request": "'$base64_json'", "signature": "'$signature'", "signer": "widevine_test" }' \
  ${la_server})
After which we check the content of the response:
echo ${wv_response}
Which should result in JSON object with a long Base64 encoded string like this (n.b., the Base64 encoded string itself also represents a JSON object):
{"response":"eyJzdGF0dXMiOiJPSyIsImRybSI6W3sidHlwZSI6IldJREVWSU5FIiwic3lzdGVtX2lkIjoiZWRlZjhiYTk3OWQ2NGFjZWEzYzgyN2RjZDUxZDIxZWQifV0sInRyYWNrcyI6W3sidHlwZSI6IlNEIiwia2V5X2lkIjoiQXBTNVdaMTFYZUs3OFAzS1A2WHF0dz09Iiwia2V5IjoiTzlvdlFEUk1mZTloUWllNXdQQStKZz09IiwicHNzaCI6W3siZHJtX3R5cGUiOiJXSURFVklORSIsImRhdGEiOiJJaEJtYTJvemJHcGhVMlJtWVd4cmNqTnFTT1BjbFpzRyIsImJveGVzIjoiQUFBQU9IQnpjMmdBQUFBQTdlK0xxWG5XU3M2anlDZmMxUjBoN1FBQUFCZ2lFR1pyYWpOc2FtRlRaR1poYkd0eU0ycEk0OXlWbXdZPSJ9XSwiZW50aXRsZWRfa2V5IjpbXSwiY29udGVudF9ncm91cHMiOltdfSx7InR5cGUiOiJIRCIsImtleV9pZCI6IjYyZHF1OHMwWHBhN3oyRm1NUEdqMmc9PSIsImtleSI6IkVBdHNJSlFQZDVwRmlSVXJWOUxheXc9PSIsInBzc2giOlt7ImRybV90eXBlIjoiV0lERVZJTkUiLCJkYXRhIjoiSWhCbWEyb3piR3BoVTJSbVlXeHJjak5xU09QY2xac0ciLCJib3hlcyI6IkFBQUFPSEJ6YzJnQUFBQUE3ZStMcVhuV1NzNmp5Q2ZjMVIwaDdRQUFBQmdpRUdacmFqTnNhbUZUWkdaaGJHdHlNMnBJNDl5Vm13WT0ifV0sImVudGl0bGVkX2tleSI6W10sImNvbnRlbnRfZ3JvdXBzIjpbXX0seyJ0eXBlIjoiQVVESU8iLCJrZXlfaWQiOiJZNTJvRFBJN1ZmTzR5clAyVFBwZDlnPT0iLCJrZXkiOiJJcDlmS2JaRDRnTUFTekRFNnZOSTlBPT0iLCJwc3NoIjpbeyJkcm1fdHlwZSI6IldJREVWSU5FIiwiZGF0YSI6IkloQm1hMm96YkdwaFUyUm1ZV3hyY2pOcVNPUGNsWnNHIiwiYm94ZXMiOiJBQUFBT0hCemMyZ0FBQUFBN2UrTHFYbldTczZqeUNmYzFSMGg3UUFBQUJnaUVHWnJhak5zYW1GVFpHWmhiR3R5TTJwSTQ5eVZtd1k9In1dLCJlbnRpdGxlZF9rZXkiOltdLCJjb250ZW50X2dyb3VwcyI6W119XX0="}
Decoding the response to get the DRM configuration info
To decode the response from the Widevine LA test server and get the KID, CEK and PSSH information that we need, we will use Python to parse the JSON objects that we need to deal with.
So, start python3 and run the following:
import os,json,base64
wvResponse = os.environ["wv_response"]
jsonResponse = json.loads(wvResponse)
jsonConfig = json.loads(base64.b64decode(jsonResponse["response"]))
print(json.dumps(jsonConfig, indent=2))
This should give the following result:
{
  "status": "OK",
  "tracks": [
    {
      "pssh": [
        {
          "drm_type": "WIDEVINE",
          "data": "IhBma2ozbGphU2RmYWxrcjNqSOPclZsG",
          "boxes": "AAAAOHBzc2gAAAAA7e+LqXnWSs6jyCfc1R0h7QAAABgiEGZrajNsamFTZGZhbGtyM2pI49yVmwY="
        }
      ],
      "content_groups": [],
      "entitled_key": [],
      "key": "O9ovQDRMfe9hQie5wPA+Jg==",
      "key_id": "ApS5WZ11XeK78P3KP6Xqtw==",
      "type": "SD"
    },
    {
      "pssh": [
        {
          "drm_type": "WIDEVINE",
          "data": "IhBma2ozbGphU2RmYWxrcjNqSOPclZsG",
          "boxes": "AAAAOHBzc2gAAAAA7e+LqXnWSs6jyCfc1R0h7QAAABgiEGZrajNsamFTZGZhbGtyM2pI49yVmwY="
        }
      ],
      "content_groups": [],
      "entitled_key": [],
      "key": "EAtsIJQPd5pFiRUrV9Layw==",
      "key_id": "62dqu8s0Xpa7z2FmMPGj2g==",
      "type": "HD"
    },
    {
      "pssh": [
        {
          "drm_type": "WIDEVINE",
          "data": "IhBma2ozbGphU2RmYWxrcjNqSOPclZsG",
          "boxes": "AAAAOHBzc2gAAAAA7e+LqXnWSs6jyCfc1R0h7QAAABgiEGZrajNsamFTZGZhbGtyM2pI49yVmwY="
        }
      ],
      "content_groups": [],
      "entitled_key": [],
      "key": "Ip9fKbZD4gMASzDE6vNI9A==",
      "key_id": "Y52oDPI7VfO4yrP2TPpd9g==",
      "type": "AUDIO"
    }
  ],
  "drm": [
    {
      "system_id": "edef8ba979d64acea3c827dcd51d21ed",
      "type": "WIDEVINE"
    }
  ]
}
Getting the KID, CEK and PSSH data from the DRM configuration
Now, you can exit your Python environment as we will run a couple of Python one-liners directly from the shell to store our KID and CEK pair and the PSSH data in shell variables.
To do this, we first store the JSON object with the Base64 decoded Widevine DRM configuration in a shell variable:
export wv_config=$(python3 -c 'import os,json,base64;print(base64.b64decode(json.loads(os.environ["wv_response"])["response"]).decode("utf-8"))')
Then, we put the variable back into Python and get the first KID and CEK pair from it (which we will also convert from Base64 to Base16 (hex) encoding, as that’s the format that our software requires):
kid=$(python3 -c 'import os,json,base64;print(base64.b64decode(json.loads(os.environ["wv_config"])["tracks"][0]["key_id"].encode("utf-8")).hex())')
cek=$(python3 -c 'import os,json,base64;print(base64.b64decode(json.loads(os.environ["wv_config"])["tracks"][0]["key"].encode("utf-8")).hex())')
And lastly we get the PSSH data, which is easier because we do not need to convert it and the data is the same for all key pairs (so we will store it only once):
pssh=$(python3 -c 'import os,json;print(json.loads(os.environ["wv_config"])["tracks"][0]["pssh"][0]["data"])')
If you want to make sure that you did everything correctly, below are the values
that should be stored in the kid, cek and pssh variables:
# KID:
0294b9599d755de2bbf0fdca3fa5eab7
# CEK:
3bda2f40344c7def614227b9c0f03e26
# PSSH:
IhBma2ozbGphU2RmYWxrcjNqSOPclZsG
Configuring Origin using the KID, CEK and PSSH data
Now, we are ready to configure our stream using the DRM configuration info that
we acquired from the Widevine LA test server. We do this using the
--widevine.key, --widevine.drm_specific_data and
--widevine.license_server_url when creating the server manifest that we
configure our stream for Origin with.
mp4split -o tos-widevine.ism \
  --widevine.key=${kid}:${cek} \
  --widevine.drm_specific_data=${pssh} \
  --widevine.license_server_url=${la_url} \
  /var/www/tears-of-steel/tears-of-steel-aac-64k.mp4 \
  /var/www/tears-of-steel/tears-of-steel-aac-128k.mp4 \
  /var/www/tears-of-steel/tears-of-steel-avc1-400k.mp4 \
  /var/www/tears-of-steel/tears-of-steel-avc1-750k.mp4 \
  /var/www/tears-of-steel/tears-of-steel-avc1-1000k.mp4 \
  /var/www/tears-of-steel/tears-of-steel-avc1-1500k.mp4

sudo mv tos-widevine.ism /var/www/tears-of-steel
Testing your stream
To test your stream, make a request for the MPD, so that you can inspect it:
# Request dynamically generated MPD for stream you have just set up with server manifest
curl ${aws_hostname}/tos-widevine.ism/.mpd
The MPD should contain a ContentProtection element that includes a reference
to Widevine:
</ContentProtection>
 <!-- Widevine -->
 <ContentProtection
   xmlns="urn:mpeg:dash:schema:mpd:2011"
   schemeIdUri="urn:uuid:EDEF8BA9-79D6-4ACE-A3C8-27DCD51D21ED">
 </ContentProtection>
Additional Hands-on
If you have extra time, please look at the following.
Using CPIX
‘pycpix’ is a Python library to simplify working with CPIX 2.1 documents. [9] This library has been used to create a prefab Docker container that outputs CPIX documents taking KID/CEK as input. [10]
In the next section we’ll use the Python library and generate our own CPIX document.
Start python3 (in Bash) and copy the following snippet into the shell:
import cpix

full_cpix = cpix.CPIX(
  content_keys=cpix.ContentKeyList(
    cpix.ContentKey(
      kid="0DC3EC4F-7683-548B-81E7-3C64E582E136",
      cek="WADwG2qCqkq5TVml+U5PXw=="
    )
  ),
  drm_systems=cpix.DRMSystemList(
    cpix.DRMSystem(
    kid="0DC3EC4F-7683-548B-81E7-3C64E582E136",
    system_id="EDEF8BA9-79D6-4ACE-A3C8-27DCD51D21ED",
    pssh=("AAAAxnBzc2gBAAAA7e+LqXnWSs6jyCfc1R0h7QAAAAINw+xPdoNUi4HnPGT"
          "lguE2FEe37S9mVyu9EwbOfPNhDQAAAIISEBRHt+0vZlcrvRMGznzzYQ0SEF"
          "rGoR6qL17Vv2aMQByBNMoSEG7hNRbI51h7rp9+zT6Zom4SEPnsEqYaJl1Hj"
          "4MzTjp40scSEA3D7E92g1SLgec8ZOWC4TYaDXdpZGV2aW5lX3Rlc3QiEXVu"
          "aWZpZWQtc3RyZWFtaW5nSOPclZsG")
    )
  )
)
Print as a formatted XML document:
print(str(full_cpix.pretty_print(xml_declaration=True), "utf-8'"))
Save the CPIX document to file as ‘/var/www/tears-of-steel/test.cpix’
Verify the CPIX document:
#!/bin/bash

cpix_verify /var/www/tears-of-steel/test.cpix print-cpix
This will print the evaluation of the CPIX document, useful for basic error checking. For more options see the CPIX documentation section. [7]
Use the CPIX document:
#!/bin/bash

mp4split -o tears-of-steel-cpix.ism \
  --mpd.cpix=/var/www/tears-of-steel/test.cpix \
  /var/www/tears-of-steel/tears-of-steel-aac-128k.mp4 \
  /var/www/tears-of-steel/tears-of-steel-avc1-750k.mp4 \
  /var/www/tears-of-steel/tears-of-steel-avc1-1500k.mp4

sudo mv tears-of-steel-cpix.ism /var/www/tears-of-steel

curl -v http://${aws_hostname}/tears-of-steel-cpix.ism/.mpd
Key Rotation
The following example represents the key rotation setup for a VOD presentation where the CPIX document is static and stored on disk.
#!/bin/bash

sudo mv vod-keyrotation-example.cpix /var/www/tears-of-steel

mp4split -o tears-of-steel-keyrotation.ism \
  --hls.cpix=/var/www/tears-of-steel/vod-keyrotation-example.cpix \
  /var/www/tears-of-steel/tears-of-steel-aac-128k.mp4 \
  /var/www/tears-of-steel/tears-of-steel-avc1-750k.mp4 \
  /var/www/tears-of-steel/tears-of-steel-avc1-1500k.mp4

sudo mv tears-of-steel-keyrotation.ism /var/www/tears-of-steel

# The master playlist
curl -v http://${aws_hostname}/tears-of-steel-keyrotation.ism/.m3u8

# To see the key rotating
curl -v http://${aws_hostname}/tears-of-steel-keyrotation.ism/tears-of-steel-keyrotation-audio_eng=128002-video_eng=751000.m3u8
You can use the vod-keyrotation-example.cpix file as an example CPIX document for a 13 minute VOD presentation (Tears of Steel) with AES-128 DRM rotating keys every minute.
Footnotes
| [1] | https://docs.microsoft.com/en-us/iis/media/smooth-streaming/protected-interoperable-file-format |
| [2] | http://docs.unified-streaming.com/documentation/drm/drm-providers.html |
| [3] | https://en.wikipedia.org/wiki/Block_cipher_mode_of_operation#Cipher_Block_Chaining_(CBC) |
| [4] | https://en.wikipedia.org/wiki/Block_cipher_mode_of_operation#Counter_(CTR) |
| [5] | http://docs.unified-streaming.com/documentation/drm/mpeg-dash.html#multi-drm |
| [6] | http://docs.external.unified-streaming.com/documentation/drm/multiple-keys.html |
| [7] | (1, 2) http://docs.unified-streaming.com/documentation/drm/cpix.html |
| [8] | http://demo.unified-streaming.com/cpix |
| [9] | https://github.com/unifiedstreaming/pycpix |
| [10] | https://github.com/unifiedstreaming/cpix-gen |